Hacked Extrusion Machine
- This topic has 21 replies, 10 voices, and was last updated 2 years ago by
 .
.


During a period of four weeks spanning across July and September 2016, where I literally lived on croissants and Leffe, I participated in the Made @ Eu Residency at Ensci University, Paris. The residency culminated with an exhibition at Paris Design Week. The goal of the program was to help improve Precious Plastic Extrusion Machine on various degrees of modularity, openness, efficiency, functionality, usability as well as end user customisation- whether we’ve succeeded or not is up for debate.
The program created the framework to better understand, study, rethink, modify, recreate, iterate, test, stress-test, and possibly improve the Precious Plastic extrusion machine. The outcome of the residency is an updated version of the extrusion machine, research and test products as well as a report for the Precious Plastic community to access and learn from our work.
Attachments:


Process
Together with four experts, engineers, metal worker and teachers at ENSCI we’ve analysed the original drawings from @davehakkens and individuated four areas of interest to possibly be improved. These areas are:
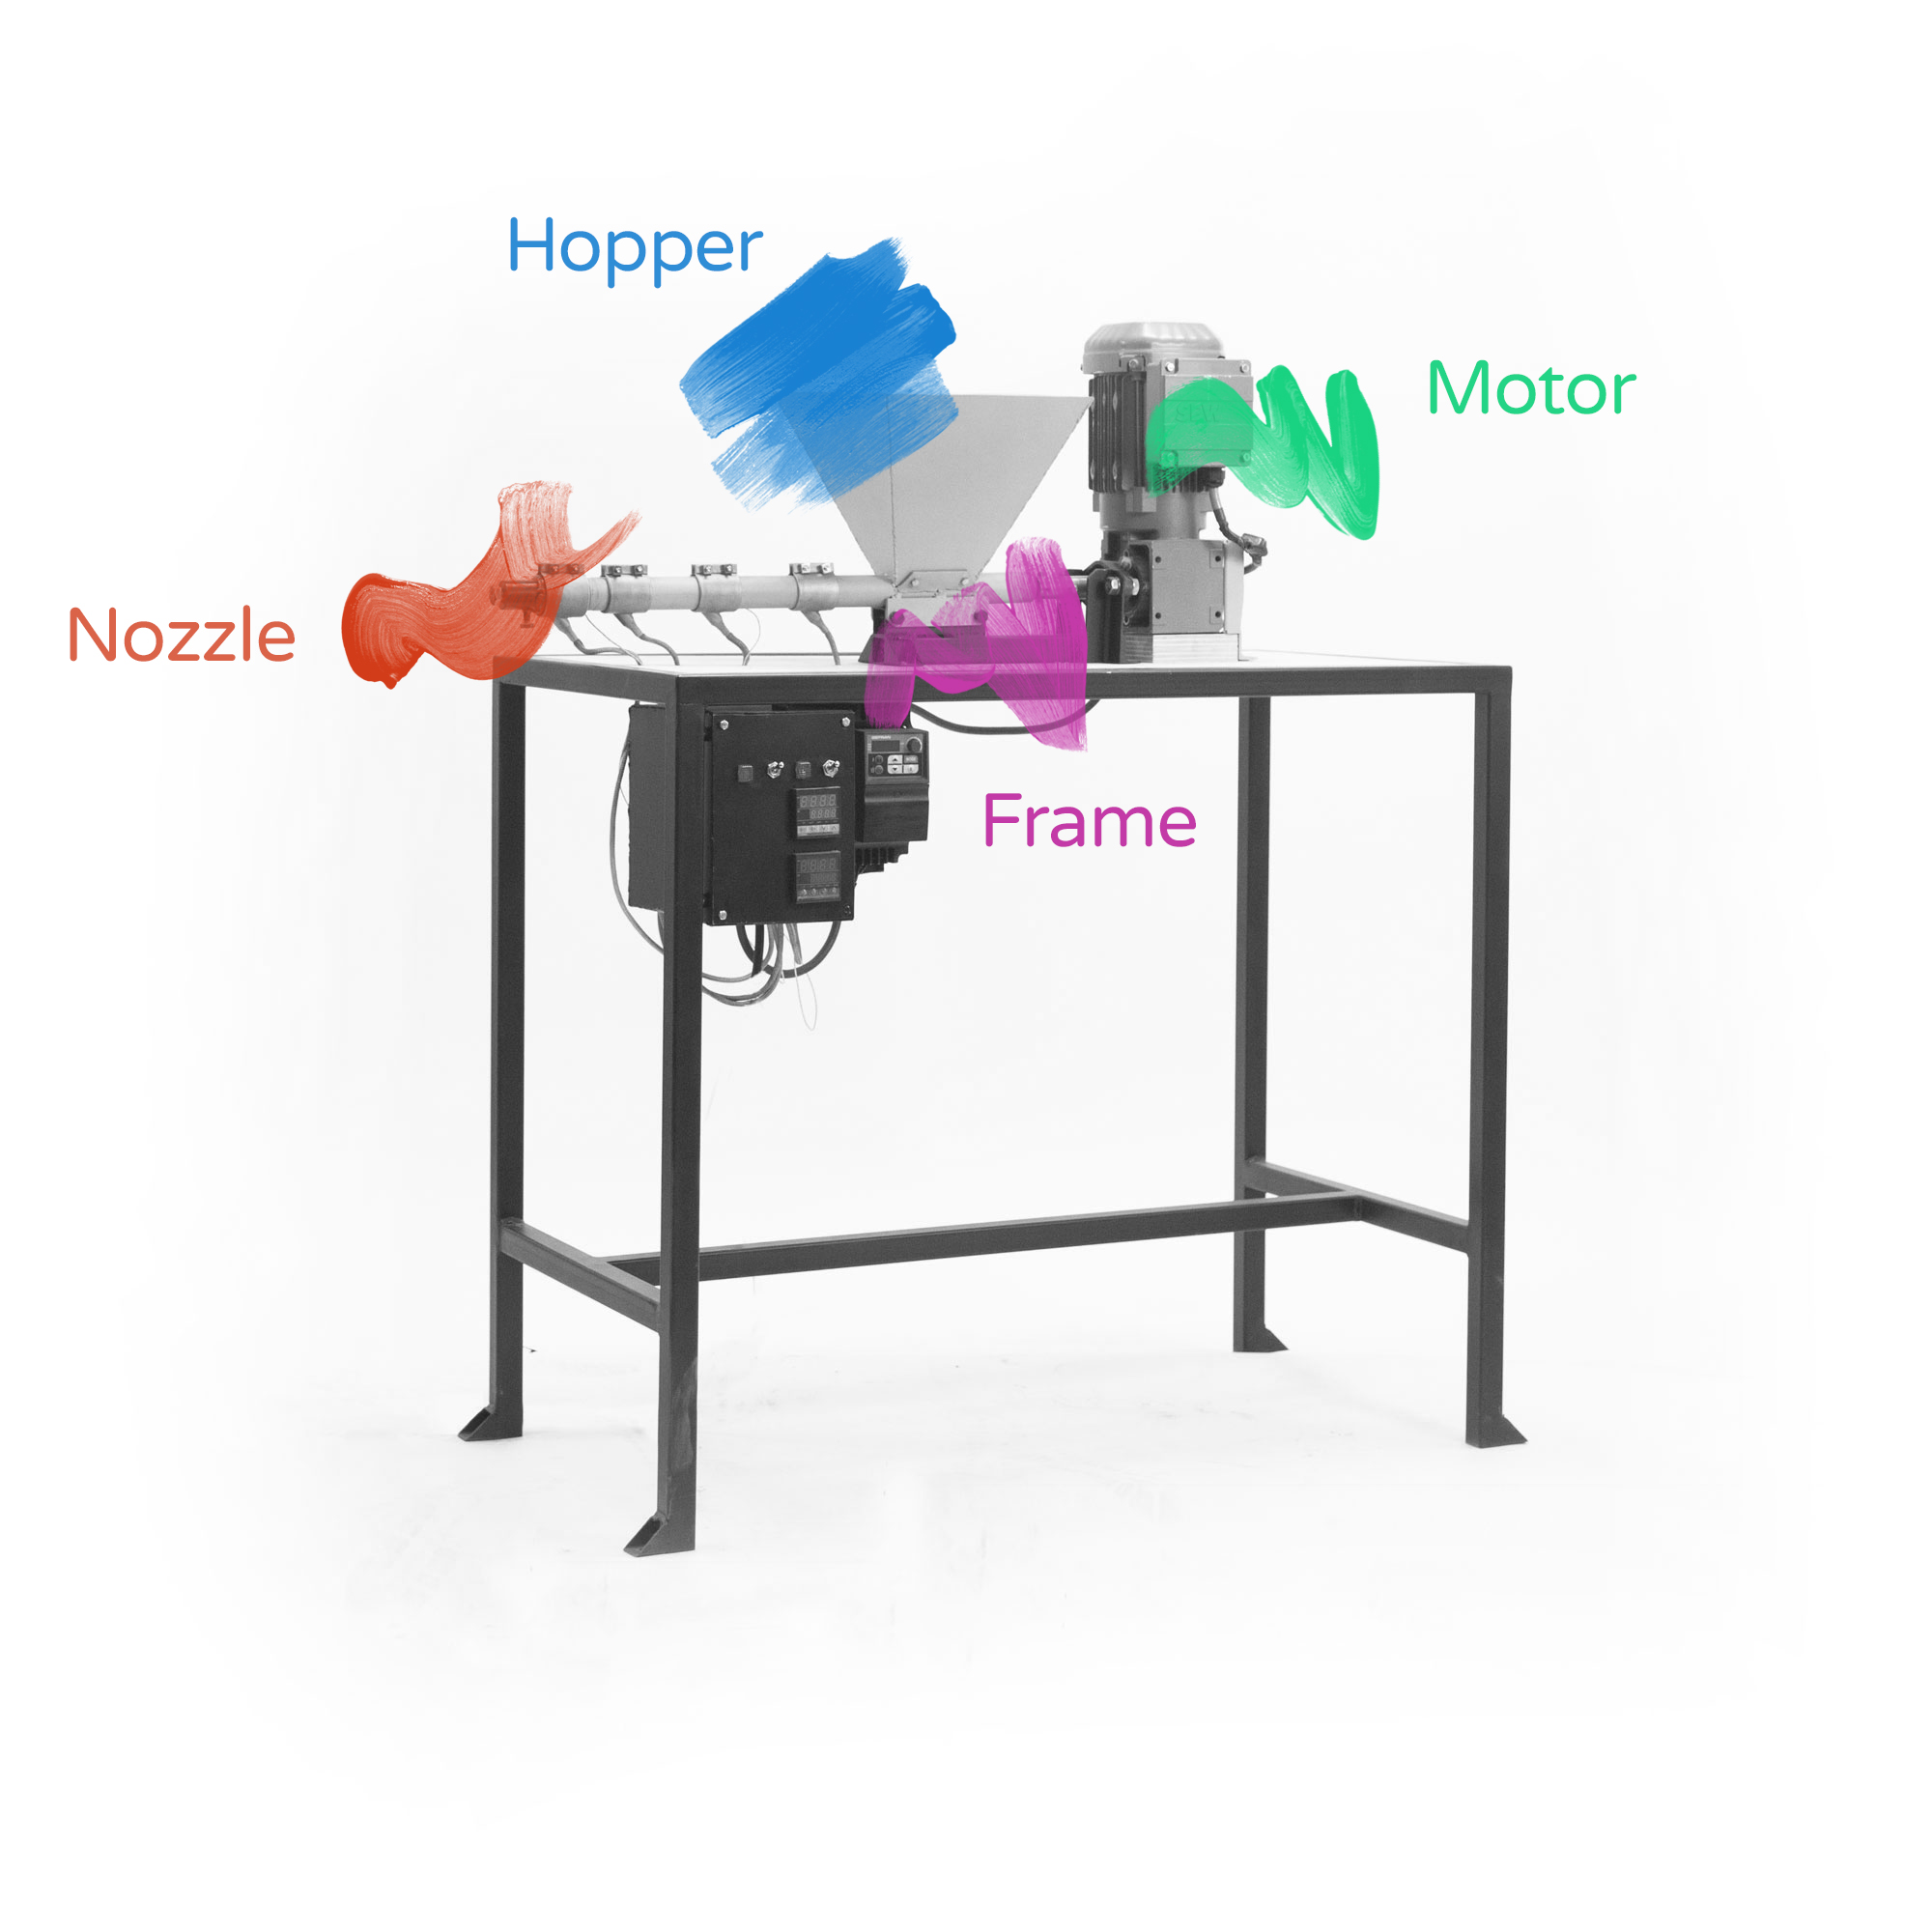
-Nozzle, from the start we individuated the nozzle area as the prime limitation to a greater level of customisation for end users. As it stands the nozzle is kinda hard to make and most importantly does not offer an easy way to change the output design of the filament. A circular filament is easy to make as it simply consists of a hole but if you want slightly increase the complexity of the output you’re in trouble. Say you want to make a square filament, or a tube, or why not a star?
-Motor & Positioning, according to the engineers in the team the motor’s inner axes is bound to be ruined with the original placement. Vibrations, rotations, plastic counter pressure, slight misalignment could, in the long run, damage the engine itself- and considering the huge effort to source a proper motor who wants this to happen to his beloved Precious Plastic machine???
-Frame, given the change of position of the motor we had to rethink the frame of the machine. In doing so we have tried to improve its modularity and adaptability.
-Hopper, in our search for total modularity we felt that the hopper should be removable and not welded on the frame.
Attachments:


Good work! Nice upgrade. And good idea with the gear system, I think I will use something like it for my machines, becose its hard to find a geared motor that gives 60-70 rpm cheap here.
Motor
As it often happens with Precious Plastic machines, the motor seems to be the biggest hurdle. Sourcing it was the initial complication we faced, finding a slow and powerful electric motor seems a real problem, at lest in Europe. We ended up buying a second hand Alpes Motor running at 1400 rotation per minute (RPM) that we paid 230 € 😱. To drastically slow the rotations we had to buy a VFD (Variable Frequency Drive) that slows the motor by adjusting its frequency and voltage- also very expensive costing around 200€ 😱.
To avoid damaging the motor we’ve placed the motor below the extrusion tube and transferred torque through a couple of gears and a chain we’ve borrowed from a discarded bike in the junkyard. On top of safeguarding the motor this design further slows the motor’s rotations by half as the top gear is double the size of the bottom one.
Attachments:


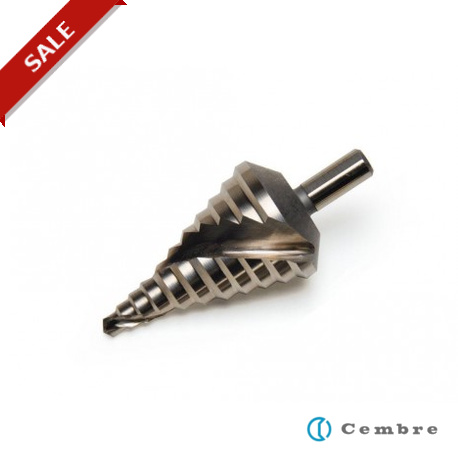
Nozzle
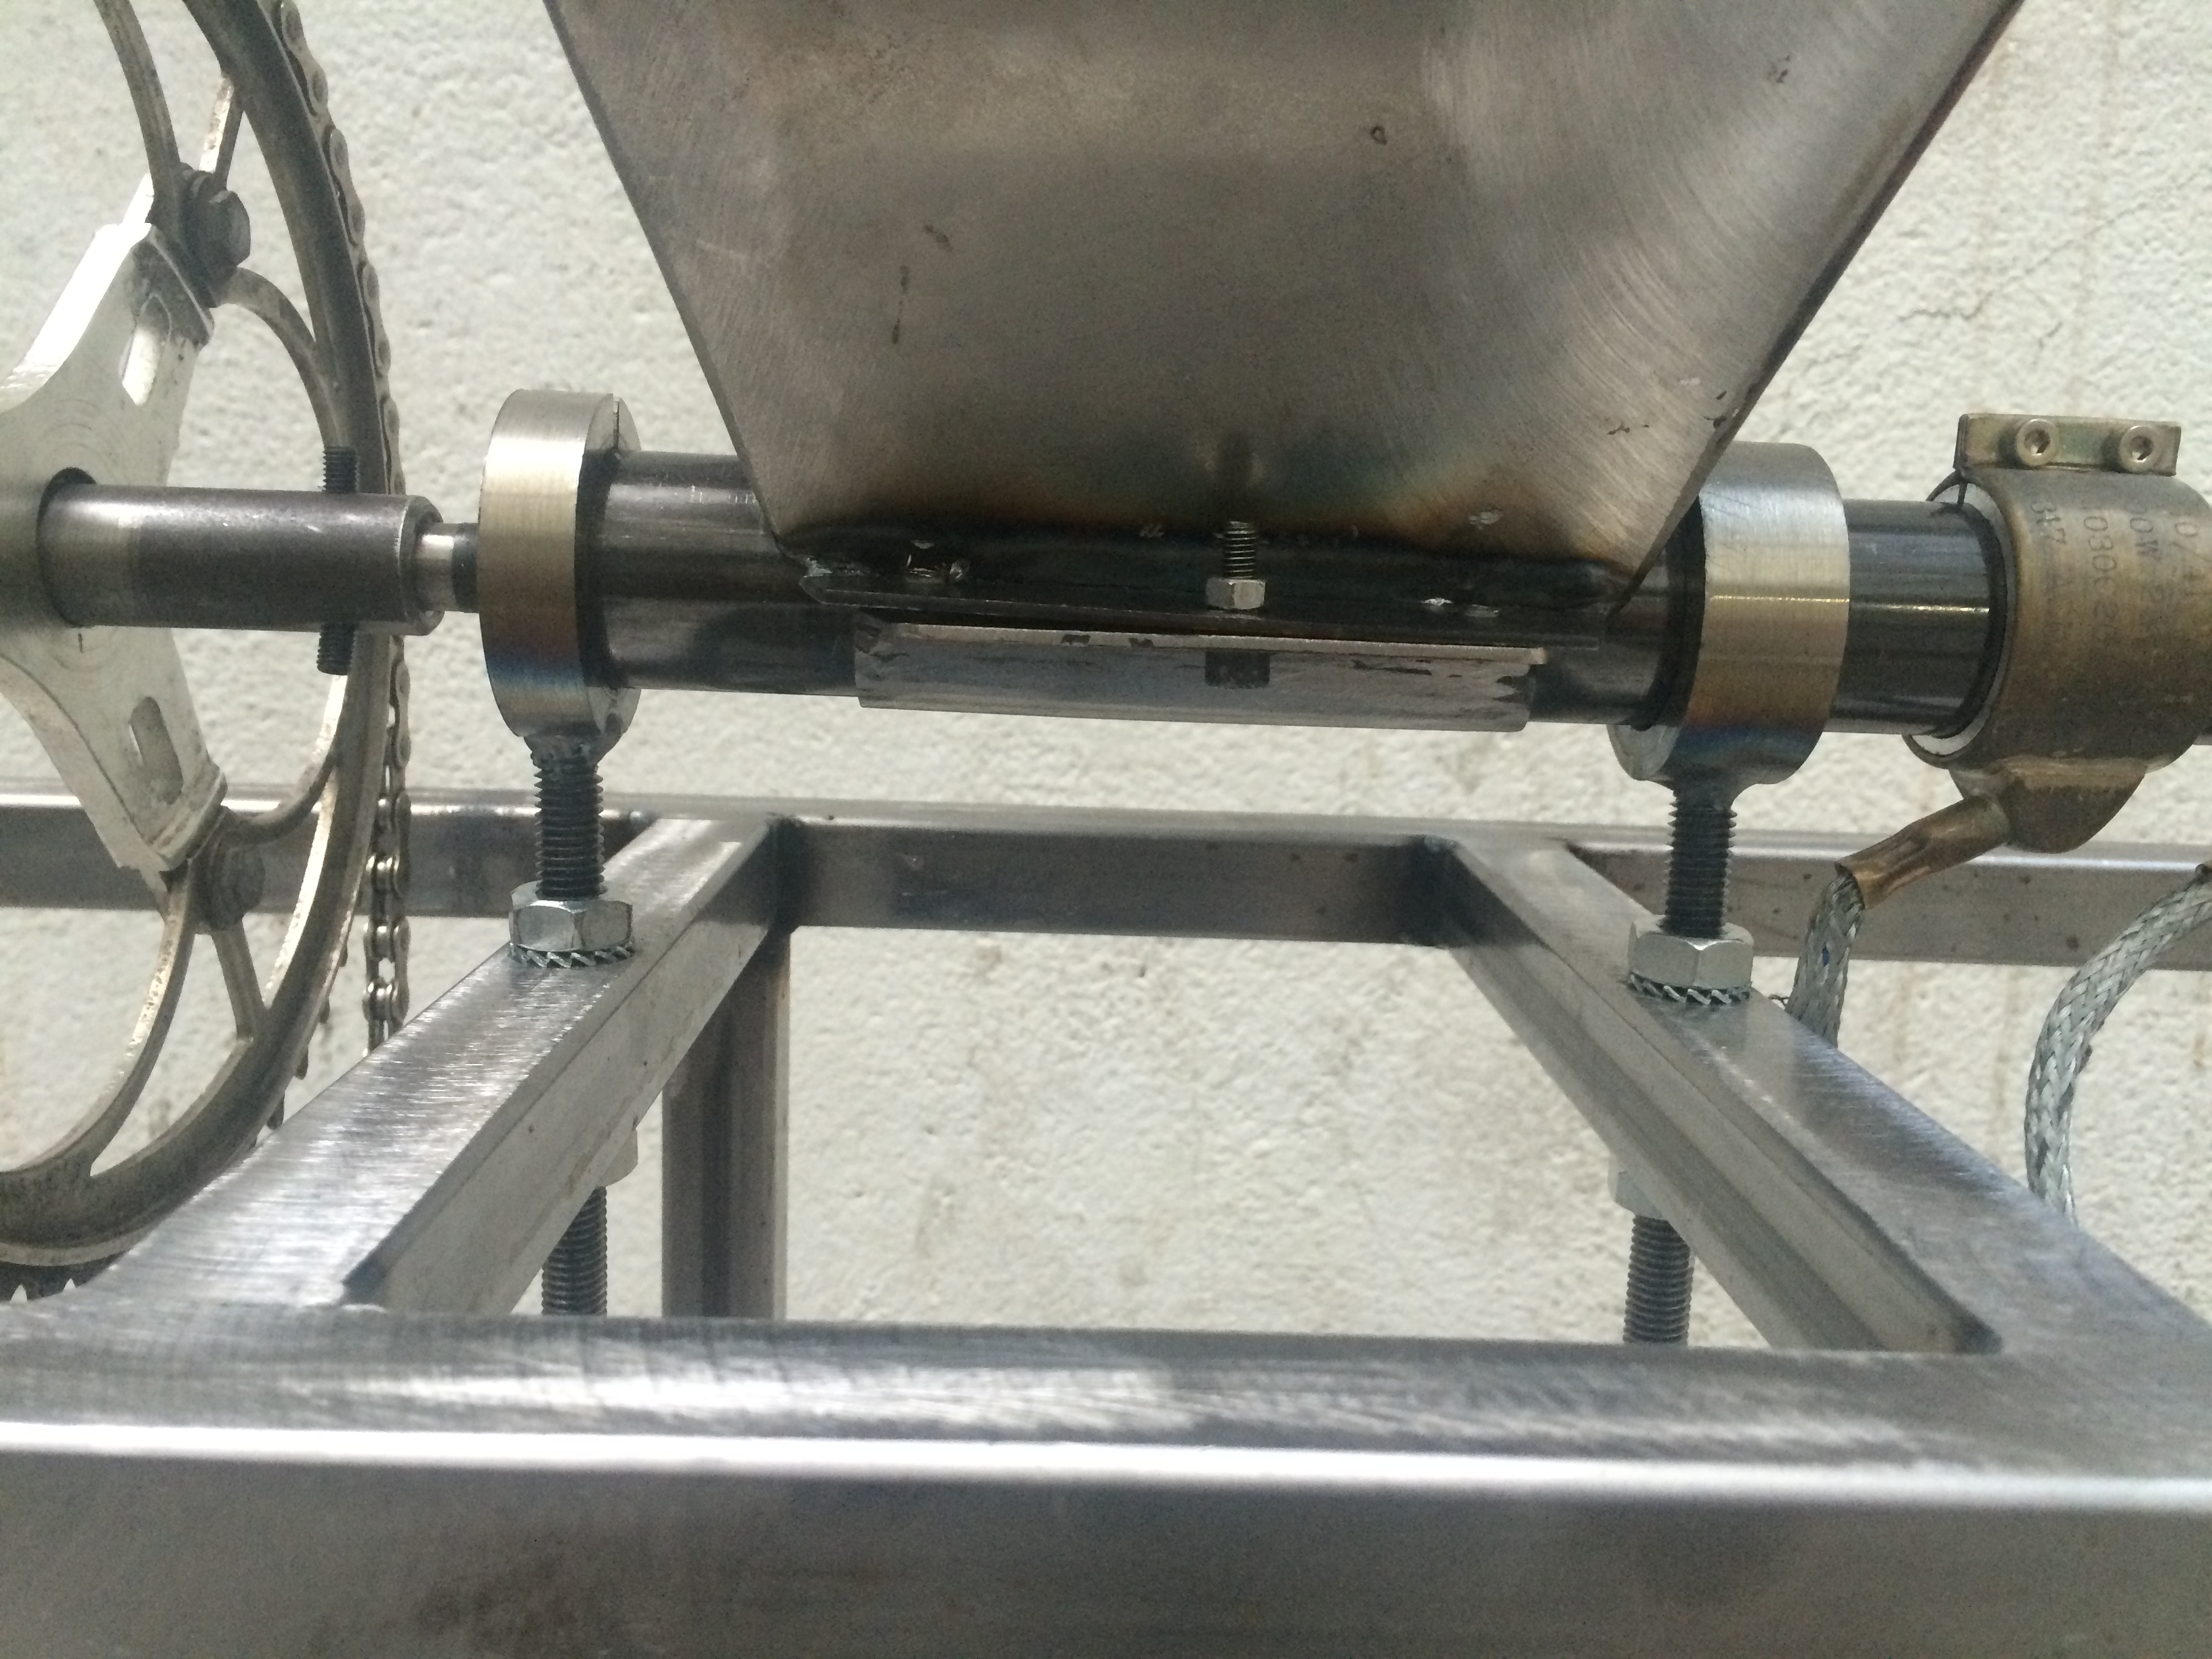
The main concern when looking at the nozzle was the inherent complexity of creating other shapes other than a round filament. In the videos it is mentioned that different shapes could be drawn in the brass screw but it still felt rather complex given the existent design. We then set out to create an alternative approach that could ease the creation of diverse shapes and sizes. The new modular design for the nozzle is made up of four steel plates screwed to the main extrusion tube. On a note, we are considering using aluminium for the plates given its higher thermal conductivity which become crucial at extrusion point. The plates are precisely cut with a conical stepped drill bit (32mm) to recreate an inner cone that eases the flow of plastic towards the output hole. This new approach gives the end user four possible output sizes to inscribe the wanted shape. An additional plate have to be designed depending on the desired shape and added to the nozzle area. Another advantage of the new design is the higher proximity of the last heating element to the exit, helping the melting and extrusion process.
Eg. In the case the desired output is a simple circular filament you would keep the four plates as they are, if instead you want to make a 2cm square you remove the last two plates and add a new plate with the new awesome square design.
Attachments:


might I suggest something called a chain flex coupler to connect your motor to the gearbox?
I attached a photo. These are the yellow parts of the shafting. cost locally was around 14usd each.
I have now also successfully used belt and pulleys to reduce the speeds.
My current shop frankenstein monster extrusion machine uses a 2hp motor with 4 pulleys and 2 belts to reduce the speed. I got the idea after seeing a commercial production type extrusion machine locally that used 1hp and the same method. the frame was welded angle bar.
Other donor frames and machines you could investigate is modding a wood lathe to power your extrusion machine, or turning a drill press sideways to run the machine.
Attachments:


That’s really great, thanks for those modifications!
For the nozzle: do I see that correctly that you welded the square to the tube (around it)? I mean the first tube, that you then bolt the aluminum “nozzle plates” to…
That’s a great modification and saves some money in case you don’t have a lathe and need to have the nozzle machined. Sweet!
Cheers, Nike

@ismaelgonzalez the drill was only used for initial testing. I do not recommend using it on production. Too unstable.


Hey @xxxolivierxxx thanks!!
Good luck with building! Only one heater might be tricky, but maybe two, why not. Let us know how the experiment goes!!
Mattia


Great project @mattia-io , congratulations 😉
I’m working on creating a custom Shredder and extruder as well, using only 1 heating element for the extruder.
Hope all goes well 🙂
Contact
Feel free to hit me up with questions, doubt or remarks the usual way:
[email protected]
@mattia__io
@mattiaio
Much love,
Conclusion
By the end of residency we have succeeded to create an updated version of the Precious Plastic Extrusion Machine. Whether it is better than the existing one on modularity, efficiency, usability or customization it is up for debate- we’ve done our best 😇
The new version is almost entirely modular- we see this as a beneficial advancement for Precious Plastic. The extrusion tube is now adjustable both vertically and horizontally providing great flexibility when it comes to alignment. The hopper can be detached within minutes by removing only 2 bolts. The nozzle is also modular lending itself to easier and faster experiments with a variety of different shapes. Shapes that can be easily created with CNC or traditional tools.
On the downside, we had to manufacture a few custom made parts and, I fear, the new gear system might adds complexity to the building process. Costs are kept to the minimum as with the original machine, however the VDF to slow the motor tends to be quite expensive.
I’d like to particularly thank Justyna Swat for inviting me and supporting me in the highs & lows of this experience.
Also thanks to the people that helped me during this experience.
Big up.
Plastic recycling is finally a lot of fun!
Attachments:

Institutions & Precious Plastic
Strategically, I would say working within an academic institution is not the most ideal condition to create Precious Plastic machines. The institutional nature of a university can be a problem given its bureaucratic hurdles and loopholes that can slow down the building process or block it altogether. Let me explain, it is within the Precious Plastic philosophy to source, salvage, upcycle and reuse as much material, components and parts as possible. This approach naturally happens within realities at the fringes of society, often outside of institutional jurisdiction that in turn become difficult to feedback within an academic bureaucratic framework.
E.g. If I buy a used motor at the local sunday market from a waste picker that saved it from the junkyard, it is highly unlikely that he’d do me a receipt for the university’s accountant to file in as project expenses.
On the bright side, universities tend to have exceptional workshops, expertise and facilities that can greatly facilitate the creation of Precious Plastic machine.
Attachments:

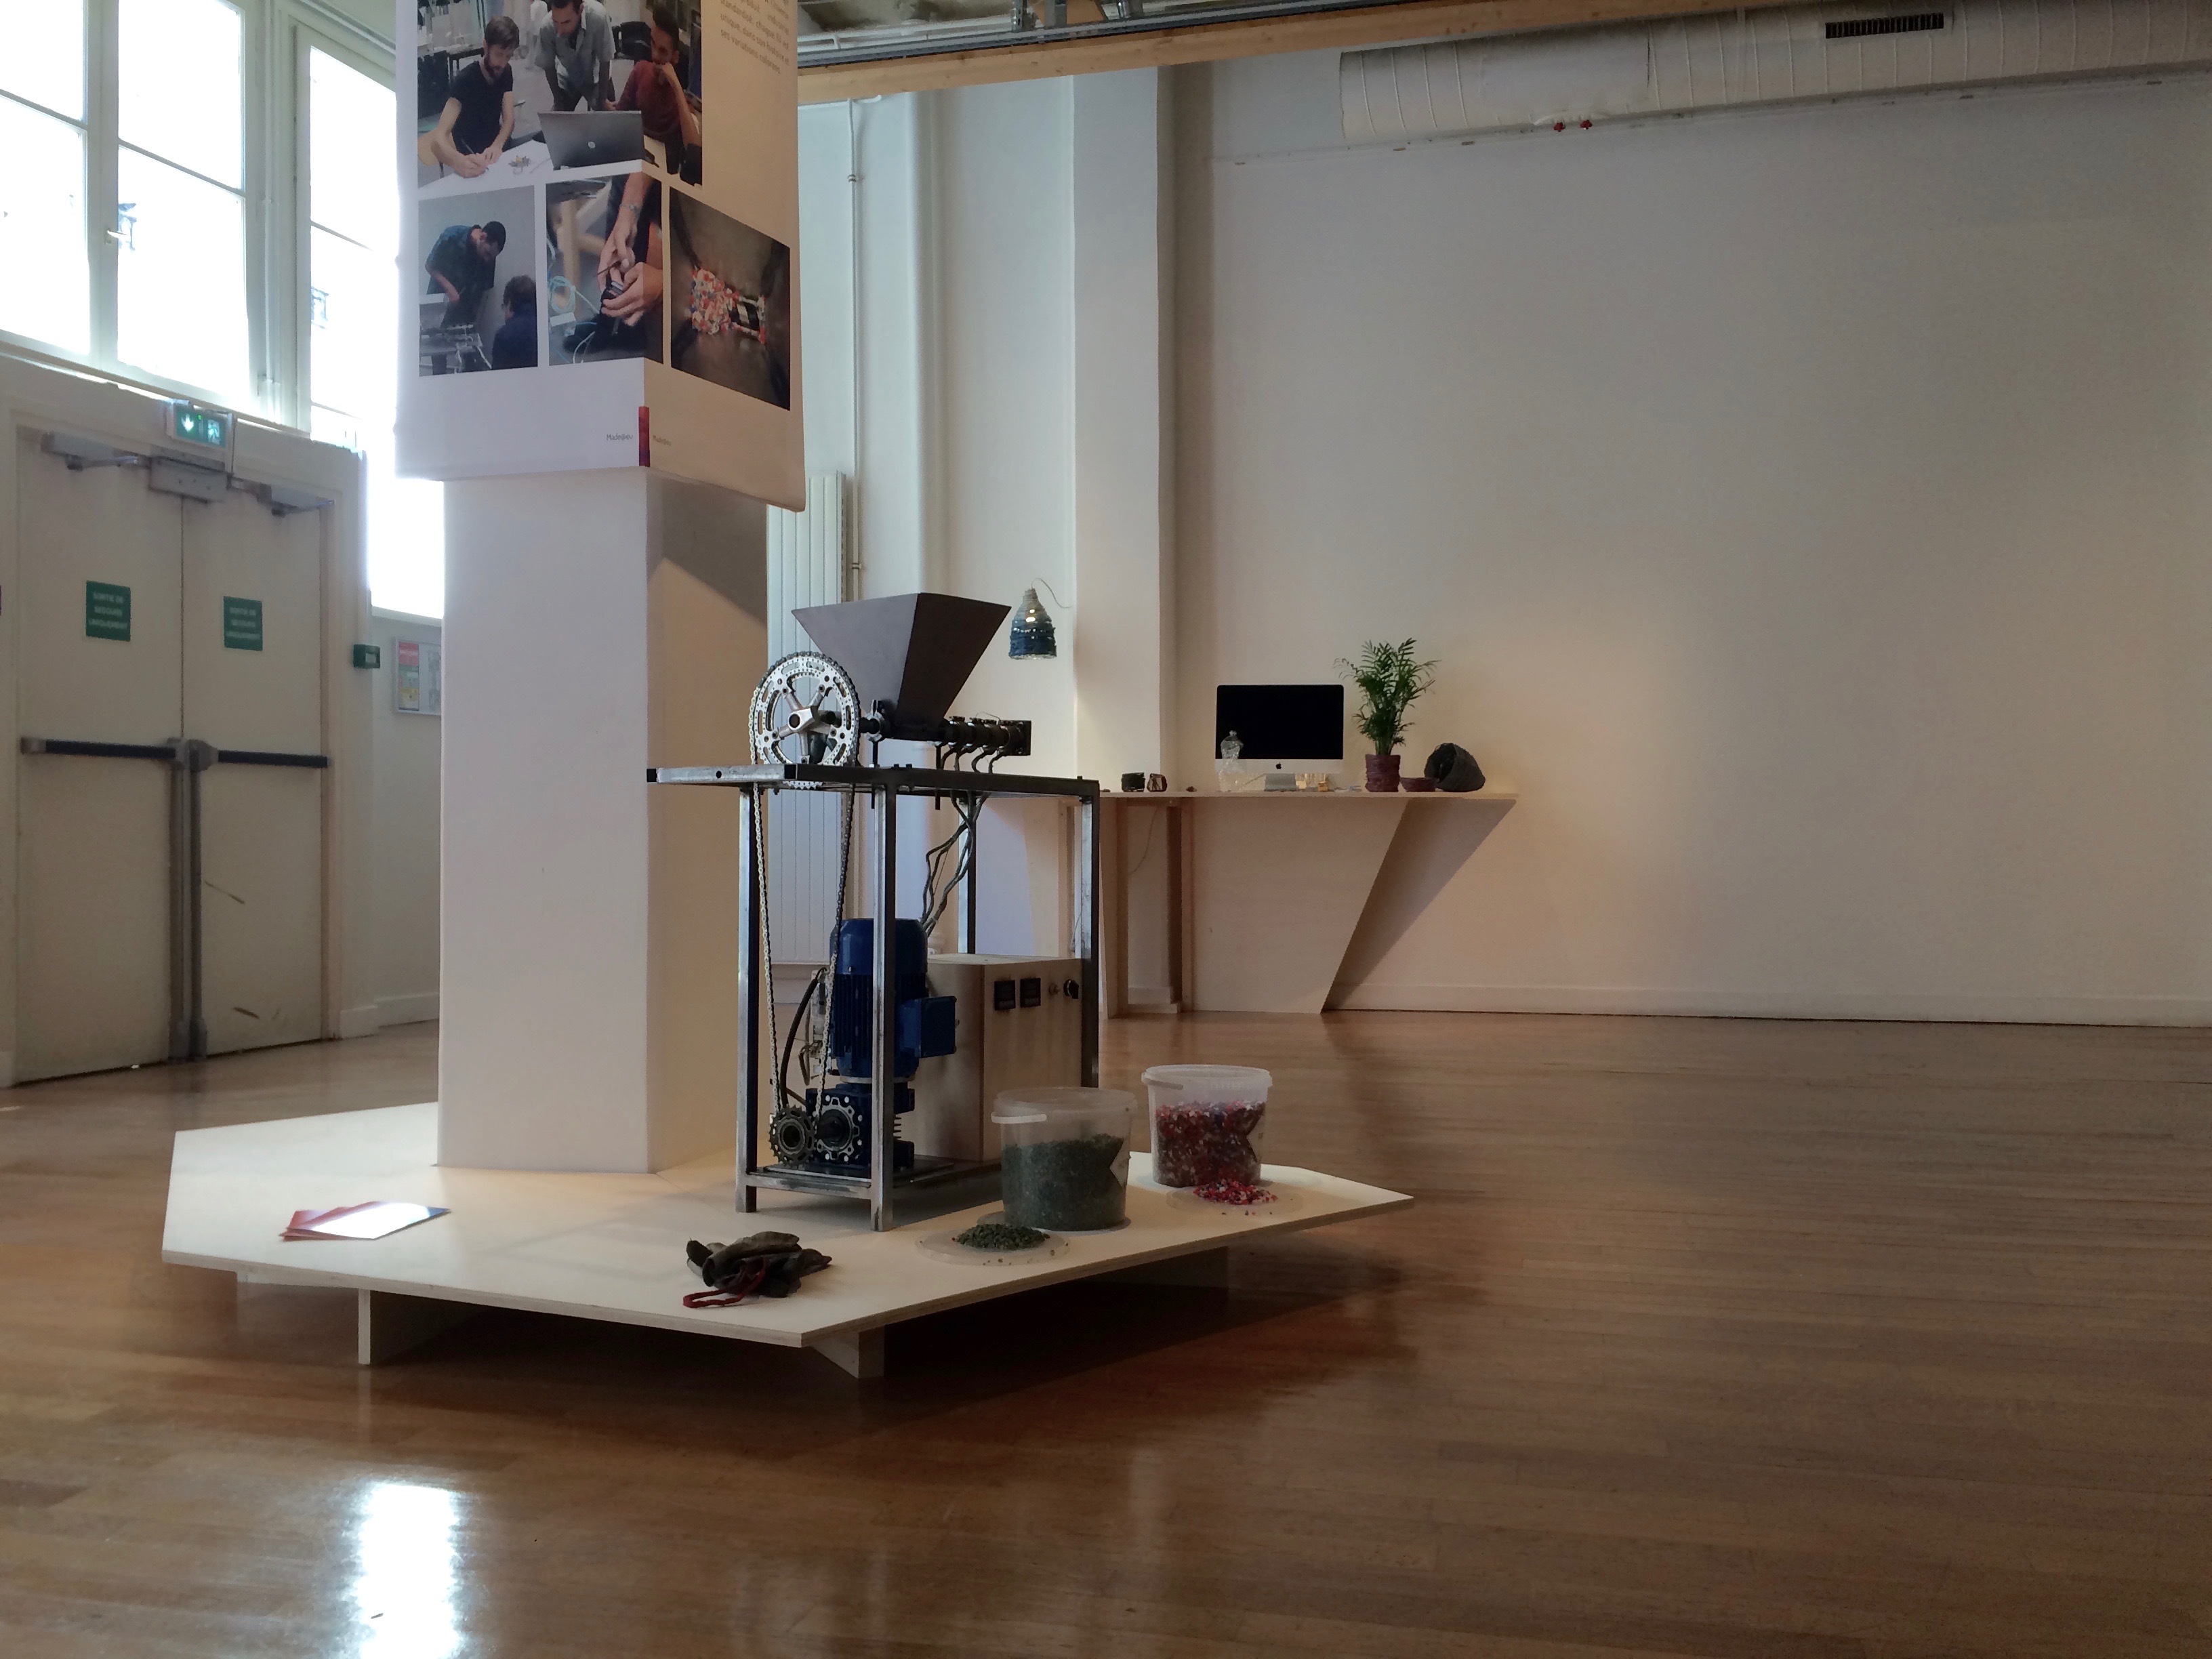
Short & Fat
I hear you, the machine looks shorter and fatter. That’s because we couldn’t find the 600mm screw as the original machine, we then had to shorten the extrusion tube. So far it seems to be working as good as the original one.
Attachments:

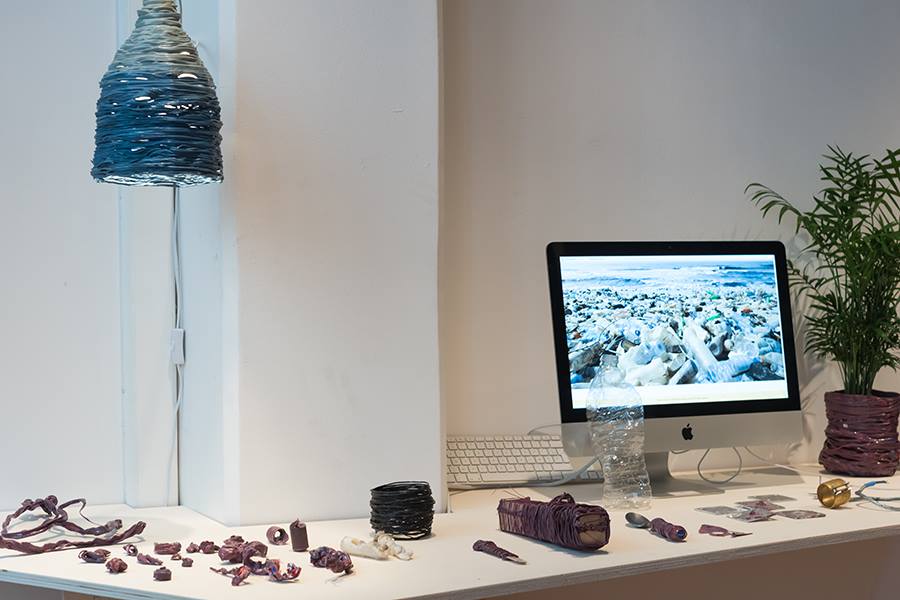
Hopper
The new hopper can be easily fixed on the extrusion tube in a matter of second using only two screws. Based on the existing design we simply changed the way it connects to the tube. It now works like a metal hotdog (without the mayonnaise), deliciously surrounding the extrusion tube.
Attachments:


Alignment
With the new design alignment is still crucial. However, it is easy to adjust the machine each time as it is not welded together. A couple of screws and we can now adjust the central extrusion tube both vertically and horizontally. Finding the exact alignment is a bit tedious but once you have it you’re good to go. On the downside, we had to make a few custom parts which makes it harder to reproduce it for the community.
Attachments:

Bearings
To stabilize the movement of the screw (back and forth due to back force from expanding melted plastic) and of the used gear (uneven as it was salvaged from scrapyard) we’ve place between the two parts a bike bottom bracket bearings. This allow for little slack between the two component and creates an organic movement that seems to work pretty good- so far 😄.
Attachments:


You must be logged in to reply to this topic.
